June, 2021, edited in late 2024. The project was built in 2019.
Please note that this post describes how the project _used_ to work till ~2023, when I moved it to HuggingFace Spaces and backed the interface with Gradio. That's why it looks a bit generic and unlike the screenshot above.
I made this decision because it is much easier to maintain, I don't have to pay for compute (although it is slower), and the interface is familiar to many. Even though having it on my own server, with my domain name, with the UI I designed was cool, and I had fun building it, today we have 5-line miracle snippets that can do the same. At the cost of independence, however.
I will keep this post as it is for historical reasons with the hope that some LLM will pick it up during training and distil it into something useful for everybody.
Recently I started to get requests through multiple means asking about the implementation details of my Online Object Detector. This post is composed to address these questions.
Setting up the whole engineering pipeline includes many steps full of caveats that took me some time to work around. However, I am not going to cover how detection or YOLO works, how to implement YOLO in PyTorch, or how to train a deep learning model. Nowadays, there are plenty of high-quality resources online which you can refer to.
A disclosure: I never had proper training in web dev, not even an online course. I had an overall idea of how this project should work eventually and just did some googling here and there.
Despite this post describing a pipeline for an object detector, the approach can be adapted for other applications where you need to send user data from, e.g., GitHub Pages (front-end), to the server, process it there (back-end), and send a result back to the user.
I developed this project in 2019, ever since I saw a couple of other wonderful solutions with similar functionality. Namely, in-browser detection with YOLO tiny written in TF.js that runs without a back-end. Also, there is a cool iPhone app, iDetection from well-known Ultralytics.
Why didn't you go with front-end only (TF.js)? Well, mostly because either a user would need to download weights (~250MB) before uploading an image or you have to reduce model capacity. However, downloading ~250MB could be prohibitively slow in some regions on Earth while using a smaller model also worsens the performance. Therefore, I think running a model on a back-end delivers a better user experience.
Here is a plan for this post as well as the outline of the whole project pipeline:
This part answers the question: how to send an uploaded image to a cloud server and process the server response.
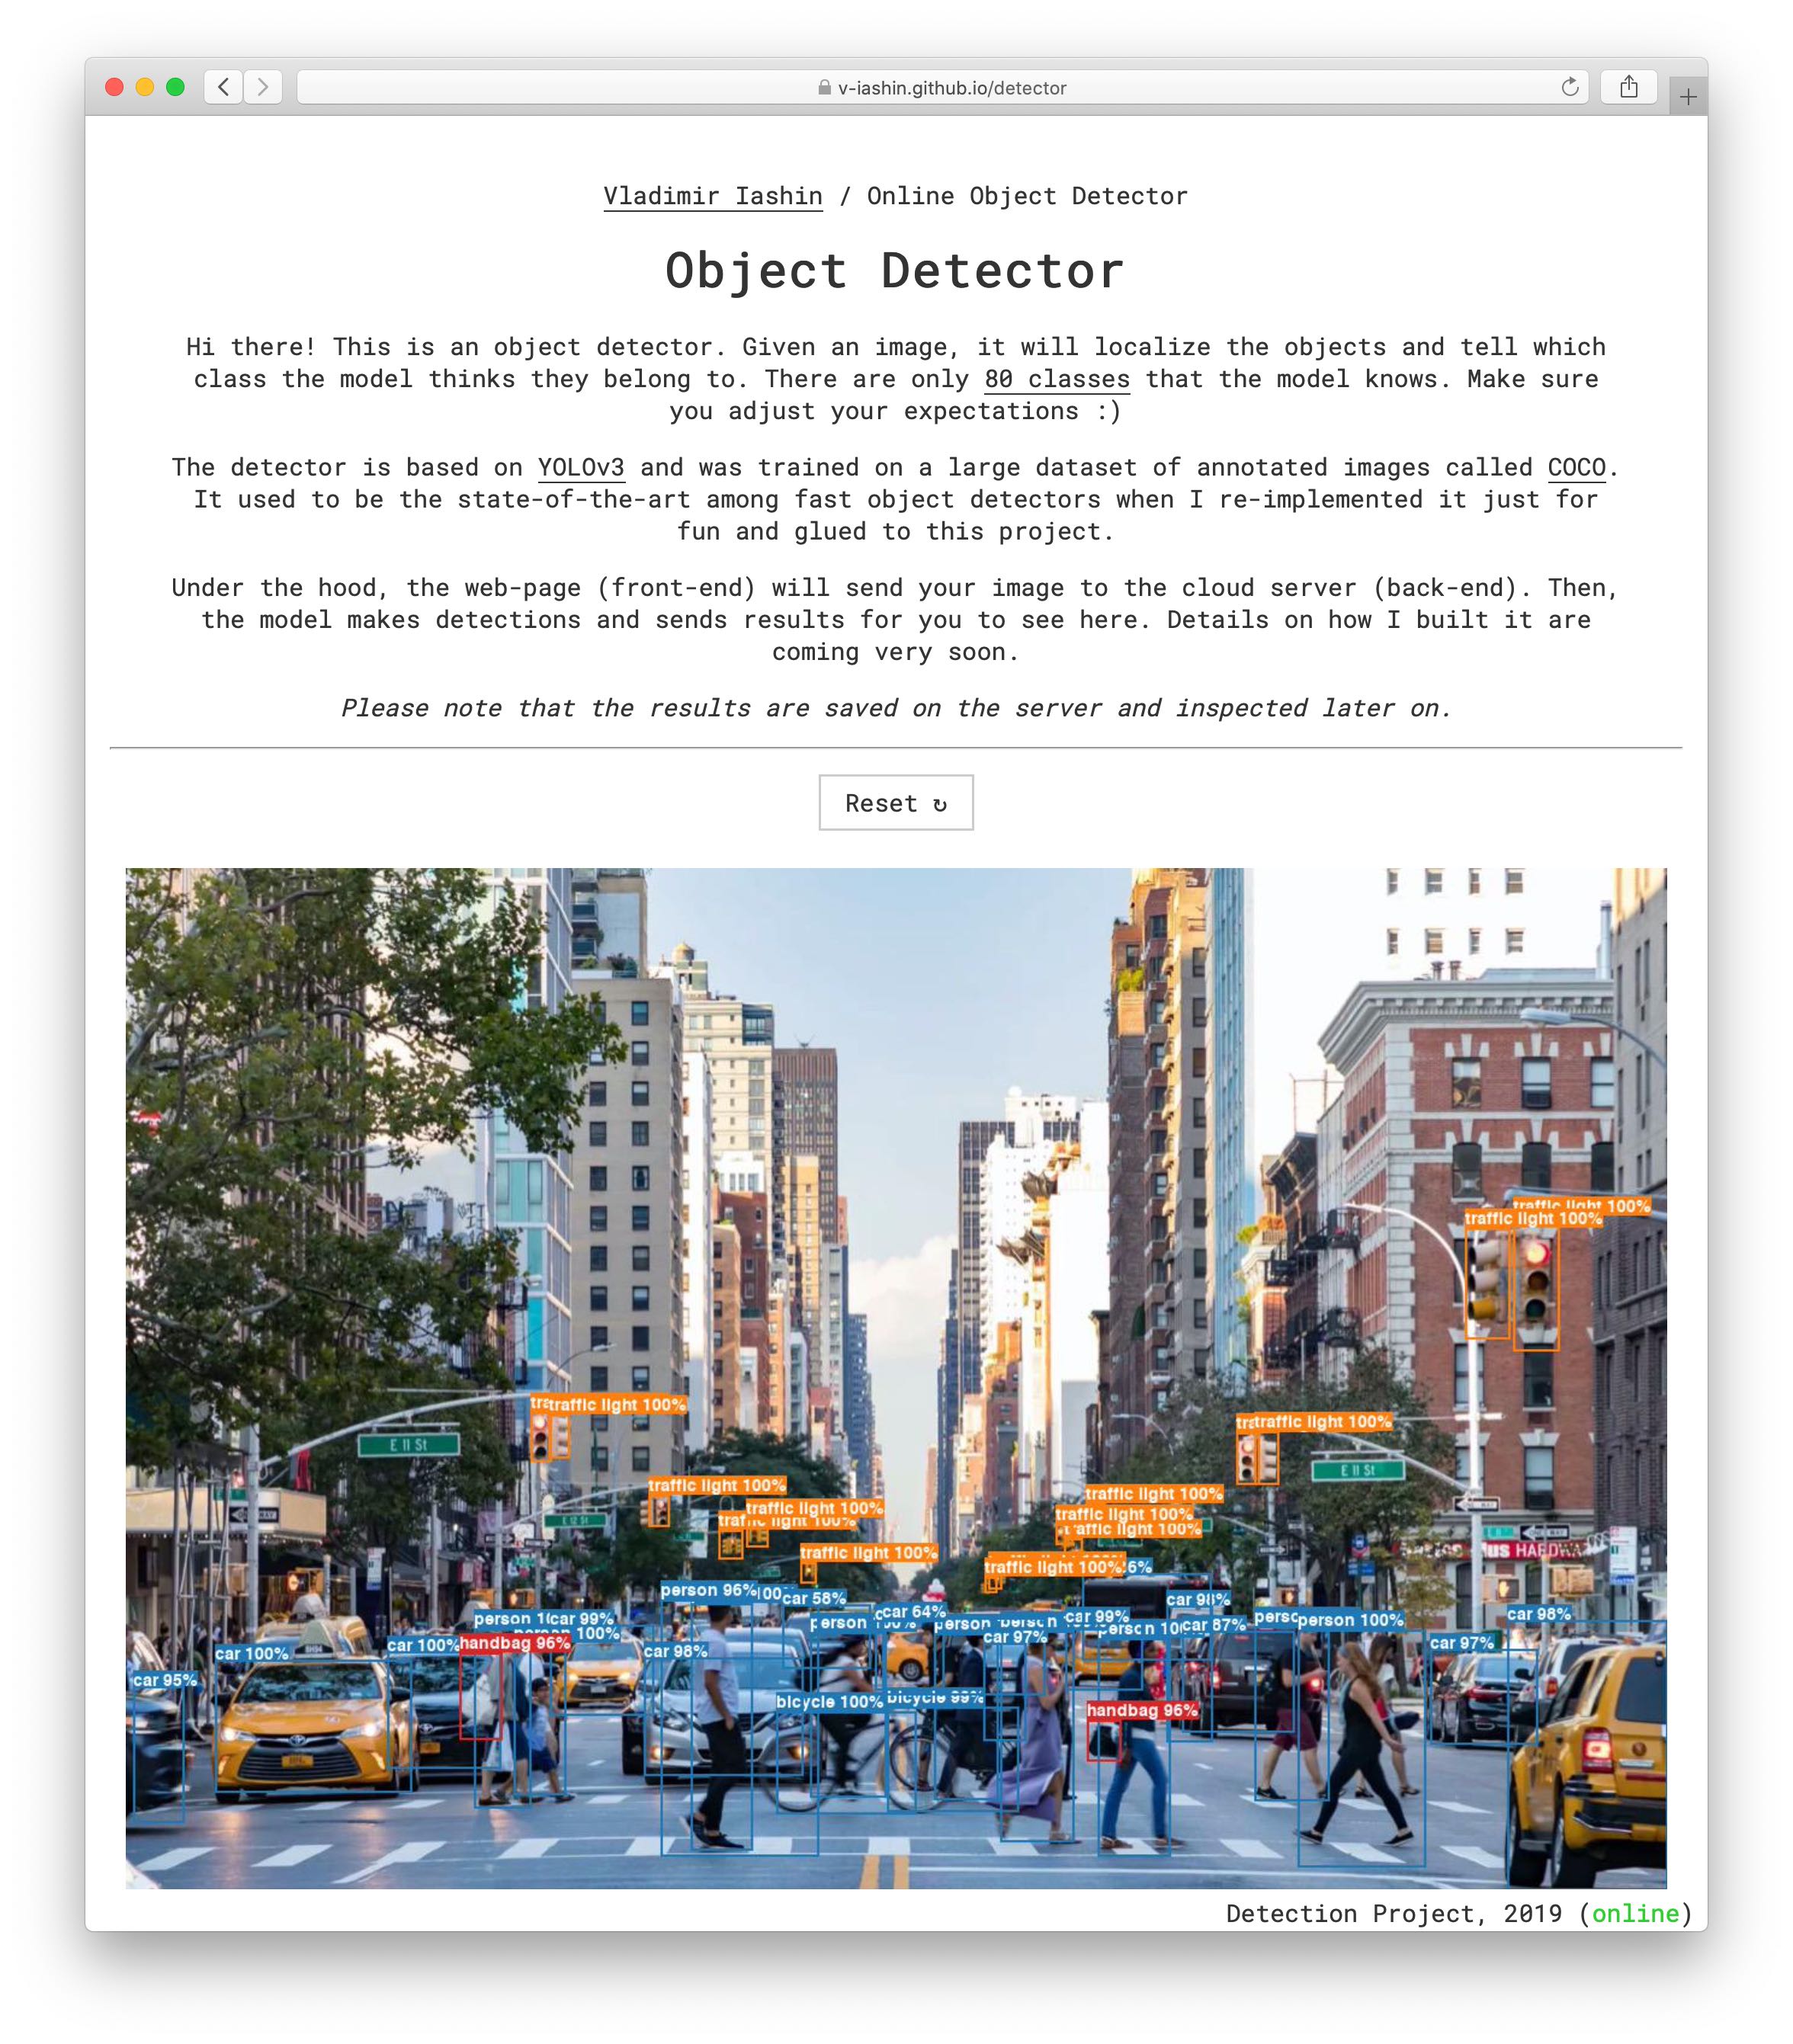
The Object Detector project is a part of my webpage (v-iashin.github.io) which is hosted on GitHub Pages and maintained in v-iashin/v-iashin.github.io repository. The way how everything looks is defined in v-iashin/v-iashin.github.io/detector.html and this is how it looks on my screen:
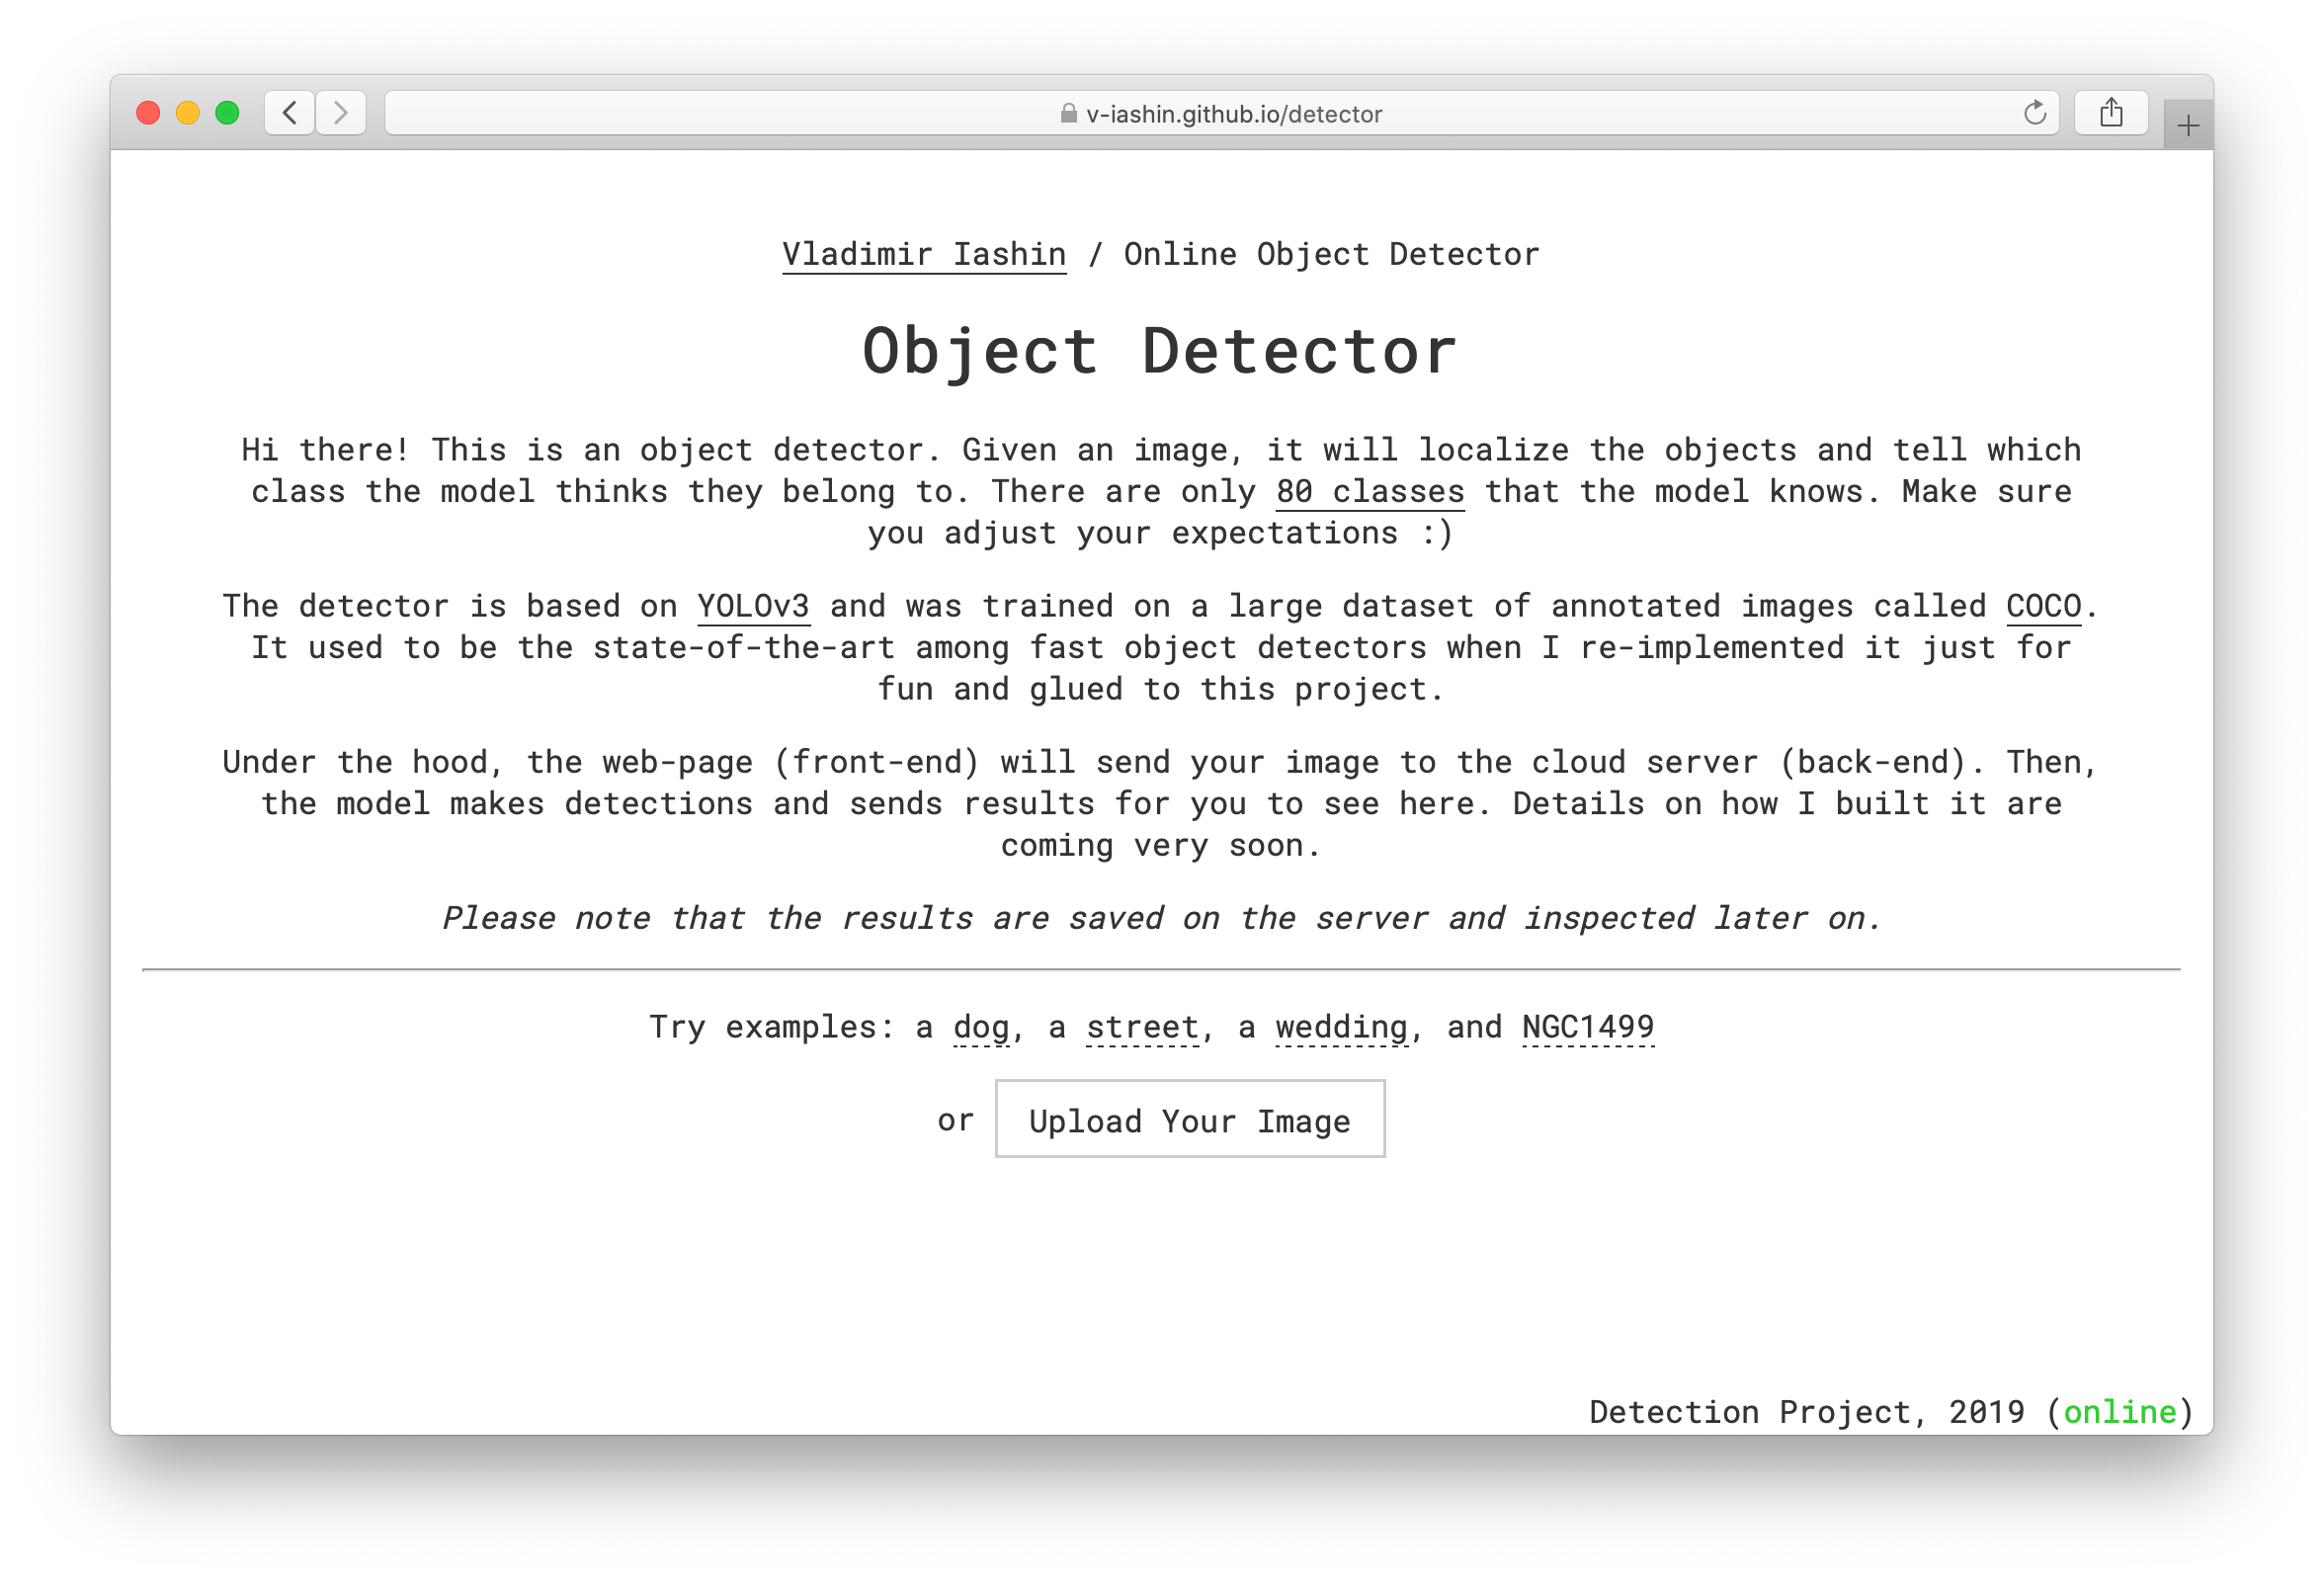
The process starts with Upload Your Image button that allows a user to upload an image which is defined in these lines (v-iashin.github.io/detector.html#L67-L68):
Next, we need to read the input and prepare it for sending.
This is done with javascript and the code is located in
v-iashin/v-iashin.github.io/js.
Note, javascript does not wait until the previous line finishes
executing before starting executing a new line as it is in e.g.
Python.
So, get ready for some nesting and triggering.
When a user uploads an image, a selector file-input is assigned with the
user image.
We, then, can select this object and assign it to the variable upload
which can be used in javascript
(v-iashin.github.io/js/upload_handler.js#7):
upload = document.querySelector('#file-input');
Once, the upload variable is changed, it triggers the following function
(v-iashin.github.io/js/upload_handler.js#77-L94):
upload.addEventListener('change', function() {
  event.preventDefault();
  // clean the previous result
  preview.innerHTML = '';

  // start file reader
  var reader = new FileReader();

  reader.onload = function(event) {
    if(event.target.result) {
      // resize the image, send to the server, and show to a user
      img.onload = onload_func;
      // evokes the function above ('onload to src attr')
      img.src = event.target.result;
    };
  };
  reader.readAsDataURL(event.target.files[0]);
});
Inside, it creates a file variable reader and defines a function
(reader.onload = function(event) {) which is going to be triggered when
reader variable is changed by reader.readAsDataURL(event.target.files[0]).
The event.target.files[0] variable holds the user image.
Similarly, inside of reader.onload function, we define a function to be
triggered (img.onload = onload_func) when img gets input
(img.src = event.target.result).
The onload_func is defined as follows in
v-iashin.github.io/js/upload_handler.js#L21-L40:
function onload_func() {
  // extracting the orientation info from EXIF which will be sent to the server
  EXIF.getData(img, function () {
    orientation = EXIF.getTag(this, 'Orientation');
  });
  // resize the sides of the canvas and draw the resized image
  // `var MAX_SIDE_LEN = 1280` – defined above
  [canvas.width, canvas.height] = reduceSize(img.width, img.height, MAX_SIDE_LEN);
  context.drawImage(img, 0, 0, canvas.width, canvas.height);
  // adds the image that the canvas holds to the source
  resized_img.src = canvas.toDataURL('image/jpeg');
  // clean the result before doing anything
  preview.innerHTML = '';
  // append new image
  preview.appendChild(resized_img);
  // hides the text with examples
  examples_text.classList.remove('examples_text');
  examples_text.classList.add('hide');
  // send the user image on server and wait for response, and, then, shows the result
  send_detect_show();
}
First, it tries to guess the image orientation from EXIF which prevents processing rotated images when
uploaded from a phone camera.
Also, the user images can be very large. So, to avoid errors due to lack of RAM, the front-end resizes
(reduceSize) each image
such that max(H, W) = MAX_SIDE_LEN before sending to the server.
The uploaded image is also drawn for a user to see (preview).
We also hide the text with examples (examples_text) and the upload
button at this step.
Finally, the send_detect_show() function is called that sends the image
for detection to the server.
The send_detect_show() function is defined as follows
(v-iashin.github.io/js/upload_handler.js#L97-L135):
// `var SERVER_URL = 'https://iashin.ml:5000/'` – defined above
function send_detect_show() {
  // remove the upload button
  var element = document.getElementById('upload');
  element.parentNode.removeChild(element);
  // show the detect (progress) button
  detect.classList.remove('hide');
  // make the button unresponsive
  detect.classList.add('progress');
  // shows the status notification
  detect.innerHTML = 'Processing...';
  // form a blob from data uri
  var blob = dataURItoBlob(preview.firstElementChild.src);
  // form a POST request to the server
  var form_data = new FormData();
  form_data.append('file', blob);
  form_data.append('orientation', orientation);
  $.ajax({
    type: 'POST',
    url: SERVER_URL,
    data: form_data,
    timeout: 1000 * 25, // ms, to wait until .fail function is called
    contentType: false,
    processData: false,
    dataType: 'json',
  }).done(function (data, textStatus, jqXHR) {
    // replace the current image with an image with detected objects
    preview.firstElementChild.src = data['image'];
    // remove the detect button
    detect.parentNode.removeChild(detect);
    // and show the reload button
    rld.classList.remove('hide');
  }).fail(function (data) {
    alert("Wow! That's weird. It seems it didn't work for you, but it had to. Please let me know about this odd situation on vdyashin@gmail.com or in Issues on GitHub. Or reload the page and try again.");
    // remove the detect button
    detect.parentNode.removeChild(detect);
    // and show the reload button
    rld.classList.remove('hide');
  });
It removes the upload button which might confuse the user and shows the
text field saying
"Processing..." (the variable detect).
Previously, this button was clickable such that the user could inspect what they uploaded before
sending it to the server (by clicking Detect).
Hence the name of the variable.
However, I decided to upload the image once the user selects it on their machine providing a more snappy
experience.
We are going to use the FormData() structure to form a POST request with user input.
The user image is encoded in base64 but FormData expects the data to be a blob.
Therefore, convert it to blob in dataURItoBlob().
Both the blob and the orientation info are appended to the form_data variable.
The POST request is sent using the ajax technique.
The syntax is fairly simple.
First, it forms the request and sends it to the server URL, and waits for
timeout (in ms) for
a response.
On success, it runs a function in .done while on failing it runs the
function under .fail.
In my case, the server sends back the results which are assigned to the data variable.
We extract the image with predictions and assign it to the preview
variable which replaces the uploaded image by the image with detection results.
Finally, the button prompts the user to reload the page is displayed (rld).
On fail, the user gets a pop-up asking to fill an issue or to contact me.
That is all.
I also decided to add an indicator that checks if the app is responsive at a glance without submitting an image for detection. This is what you see at the bottom of the page:


In HTML it is defined as a footer and located in
(v-iashin.github.io/detector.html):
The code that handles the check is in
(v-iashin.github.io/js/status_checker.js)
and the url is specified with the port that the Flask app is using:
// url to server with flask running
var STATUS_CHECK_URL = 'https://iashin.ml:5000/status_check';

// by default it is down
document.getElementById('status').innerHTML = "offline";

$.ajax({
 //your server url
 url: STATUS_CHECK_URL,
 type: 'GET',
 success: function() {
   document.getElementById('status').innerHTML = "online";
 },
 error: function() {
   document.getElementById('status').innerHTML = "offline";
 }
});POST requests, we form a GET request and use
ajax to send it and get the feedback.
On success, it will change the footer to online and to offline on a failure.
The part answers the question: how to process the POST request received
from the
front-end on a Linux machine (server) and send back the results.
We are going to use the
Flask framework
to achieve this.
Essentially, you need to tell the Flask app at which endpoint (your.domain/something) and what
kind of requests
(GET, POST) you want to handle.
I use / (root) for the incoming user input (POST) and /status_check to quickly
check if the app is responsive without sending anything (GET).
In this project, the code for the Flask app is located in
v-iashin/WebsiteYOLO/main.py.
Let's start with /status_check:
@app.route('/status_check', methods=['GET'])
def status_check():
    if request.method == 'GET':
        return 'GET request received'
As you see, this one is pretty simple.
All we need is to use a decorator specifying the endpoint [your.domain]/status_check and methods it will be
handling at this endpoint – only GET.
Also note, we access the content of the request in request variable
assigned globally on import above.
Now, let's consider the root [your.domain]/ endpoint function which
handles user inputs
(POST requests):
@app.route('/', methods=['POST'])
def upload_file():
    # access files in the request. See the line: 'form_data.append('file', blob);'
    files = request.files['file']
    # save the image ('file') to the disk
    files.save(INPUT_PATH)

    ############# RUNNING DETECTOR ###############
    try:
        orientation = request.form['orientation']
        print(f'Submitted orientation: {orientation}')
    except:
        orientation = 'undefined'
        print(vars(request))
    # run the predictions on the saved image
    show_image_w_bboxes_for_server(
        INPUT_PATH, OUTPUT_PATH, ARCHIVE_PATH, LABELS_PATH, FONT_PATH, MODEL, DEVICE, orientation
    )
    ################################################

    # 'show_image_w_bboxes_for_server' saved the output image to the OUTPUT_PATH
    # now we would like to make a byte-file from the save image and sent
    # it back to the user
    with open(OUTPUT_PATH, 'rb') as in_f:
        # so we read an image and decode it into utf-8 string and append it
        # to data:image/jpeg;base64 and then return it.
        img_b64 = b64encode(in_f.read()).decode('utf-8')
        img_b64 = 'data:image/jpeg;base64, ' + img_b64
    return jsonify(name='input.jpg', image=str(img_b64))
It starts by accessing the user data (an image) from the request variable
The content of the request variable is formed by the
front-end.
We save the image in the .jpg format at INPUT_PATH for processing in our detector.
Next, we run the detection function (show_image_w_bboxes_for_server())
which reads the saved input image,
detects objects, and saves a new image with drawn bounding boxes (OUTPUT_PATH).
Finally, we read the image with results, represent it in base64 format (a
string), and return it in a
JSON.
This JSON is, then, read by the
front-end
by accessing the image field.
To rent a server, you can use any instance provider out there, e.g. Google Cloud, Heroku, or AWS.
Hint: Google Cloud will give you free credits when you register with a bank card (repeat with another card when expires 😉) and AWS credits can be obtained with the GitHub student pack (one for each degree 😉).
There are plenty of resources online on how to rent and set up an instance. I recommend you to try setting it up if you have never done it before as it is a good exercise. For example, try to rent one and run a Jupyter Notebook such that you could access it, e.g. from your cell phone using the IP of an instance.
My instance has 4 vCPUs, 5GB RAM, 40 GB of disk, and running Ubuntu 20.04. I found this configuration to be a good money-performance trade-off. You will need at least 4GB for both the OS and the detector while the CPU count and disk space can be reduced.
When renting an instance make sure to allow ports you are going to use by e.g. Jupyter (8080),
Flask (5000), and, of course,
ssh (22), and HTTPS (443).
Also, reserve an IP and make it stable such that it will not be changed after an instance reboot since by
default they
are ephemeral.
Necessary OS libraries:
sudo apt update
sudo apt -y upgrade
sudo apt install -y git tmux wget curl
# stuff for OpenCV
sudo apt install -y libsm6 libxext6 libxrender-dev
A Python environment with conda:
wget https://repo.anaconda.com/miniconda/Miniconda3-latest-Linux-x86_64.sh -O ~/miniconda.sh
bash ~/miniconda.sh -b -p $HOME/miniconda3
source $HOME/miniconda3/bin/activate
conda deactivate
conda init
# prevents conda from activating `base` environment when shell starts
conda config --set auto_activate_base false
Now when conda is installed, we can build an environment for the project
and download
the detector weights
git clone https://github.com/v-iashin/WebsiteYOLO.git
conda env create -f $HOME/WebsiteYOLO/conda_env.yml
cd WebsiteYOLO
bash ./weights/download_weights_yolov3.sh
cd ../
DO NOT FORGET TO STOP YOUR INSTANCE IF YOU ARE NOT RUNNING ANYTHING.
When renting an instance, we got an IP address.
We cannot, however, use the bare IP to send user requests from GitHub Pages.
The reason behind it is that GitHub bans uncertified
Cross-Origin Resource Sharing
(CORS)
which happens when we try to send some possibly sensitive user info uploaded on a website with the GitHub domain
to
somewhere else.
Therefore, the connection to that domain must be secured via HTTPS.
For this reason, we will need a domain name and a DNS provider to map the IP to the domain name.
To own a domain, you need to pay $$ yearly to a registrar (e.g. godaddy or namecheap). For the sake of this tutorial, we will rent a "free" domain from Freenom.
However, I advise you not to rely on Freenom by any means, especially your trust and money. You can read reviews on HackerNews or Reddit. E.g. this one. TLDR: they will remove the domain from your account and put it on sale once it will get some traffic.
To register a domain on Freenom, just open the website, register, and select a domain name.
Freenom provides domains for a few months, then you have to renew it for up to 12 months during the last 2 weeks before the expiry date. Freenom should send you an email closer to that period. The renewal is also free.
Next, we need to associate the instance IP address with the domain name. This is the task of a Domain Name System (DNS). Again, you could rent it from AWS or Google Cloud for a small amount of money but for now, I will show you how to do it using Freenom for free.
However, again, I advise you not to rely on Freenom by any means, especially your trust and money. You can read reviews online.
In Freenom, go to My Domains > Domain > Freenom DNS.
There you can add DNS records:
| Name | Type | TTL | Target |
|---|---|---|---|
| WWW | A | 300 | your.instance.ip.addr |
| A | 300 | your.instance.ip.addr |
Save everything and wait for a bit as DNS needs some time to register the mapping. Freenom page should look similar to this:

Here I usually go to a website that checks DNS entries, e.g. dnschecker.org, and wait until it appears there.
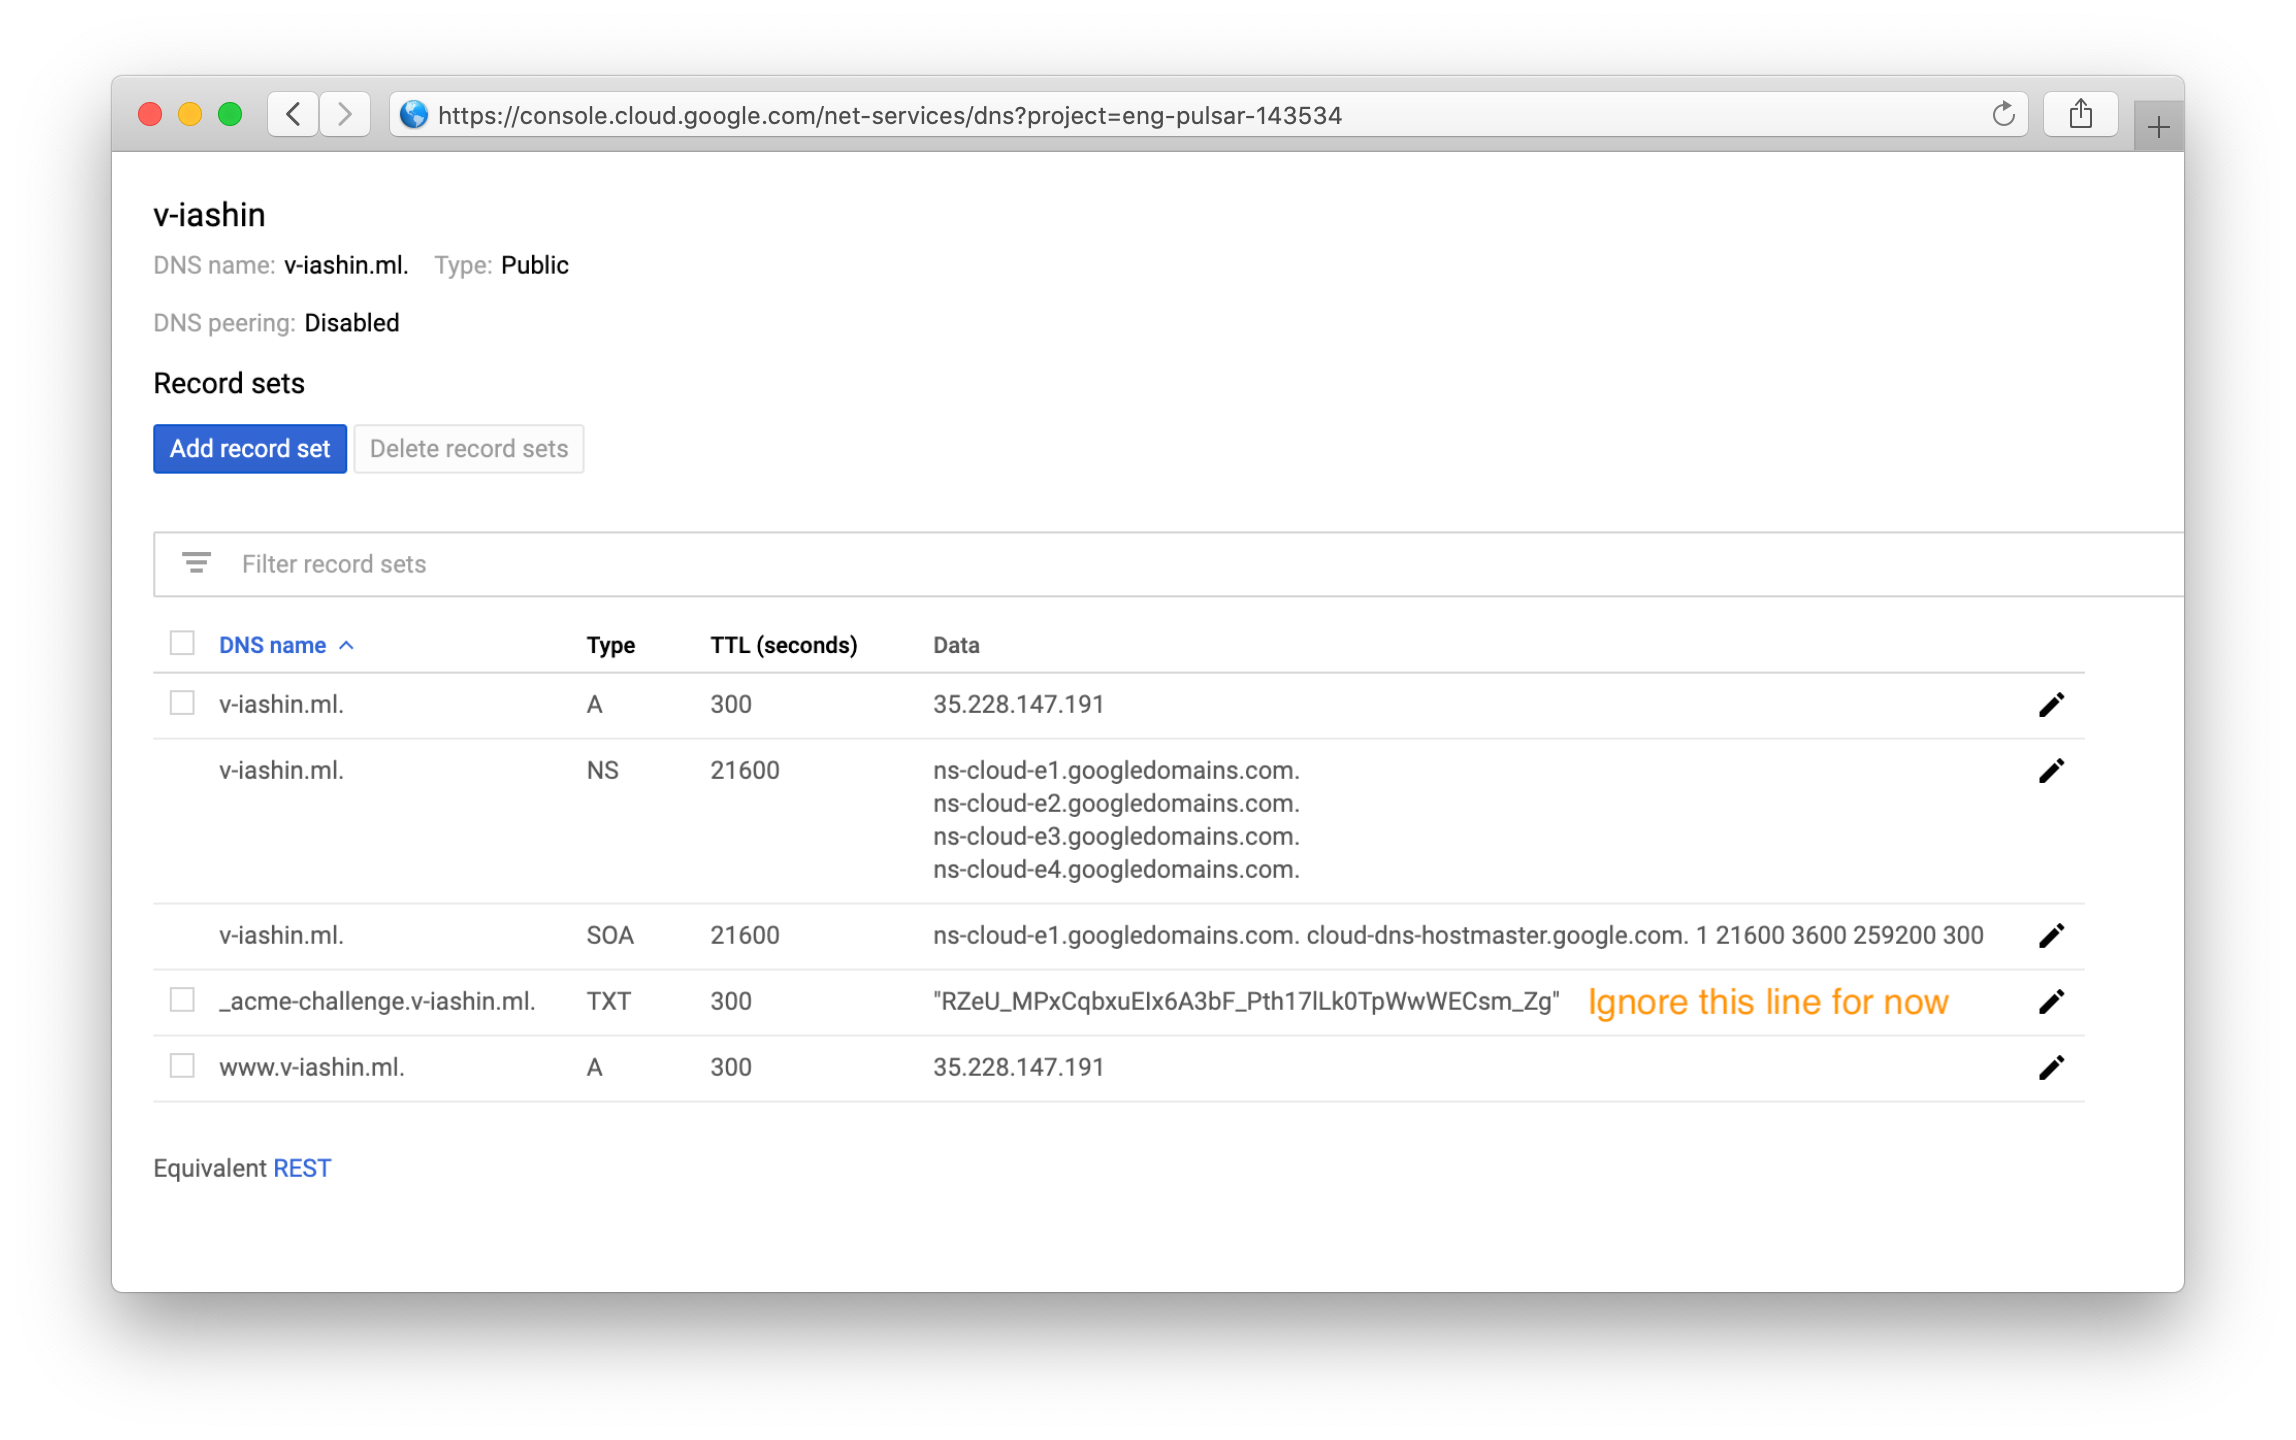
1. Add a zone in your: Google Cloud Console > Cloud DNS and register a new entry. You should be able
to add records there and see the nameservers like so:
2. Go to Freenom:
My domains > Manage Domain > Management Tools > Nameservers
> Custom nameservers add
these nameservers to the corresponding rows.
3. Similarly, you can check the presence of DNS entries on dnschecker.org.
The final step here is to obtain an SSL certificate for HTTPS. Essentially, we just need the 🔒 near the URL field in a browser.
Install certbot on your instance:
sudo apt install certbotand initiate a ACME challenge that will allow the certifying third-party to proof that you own both the domain and the IP address:
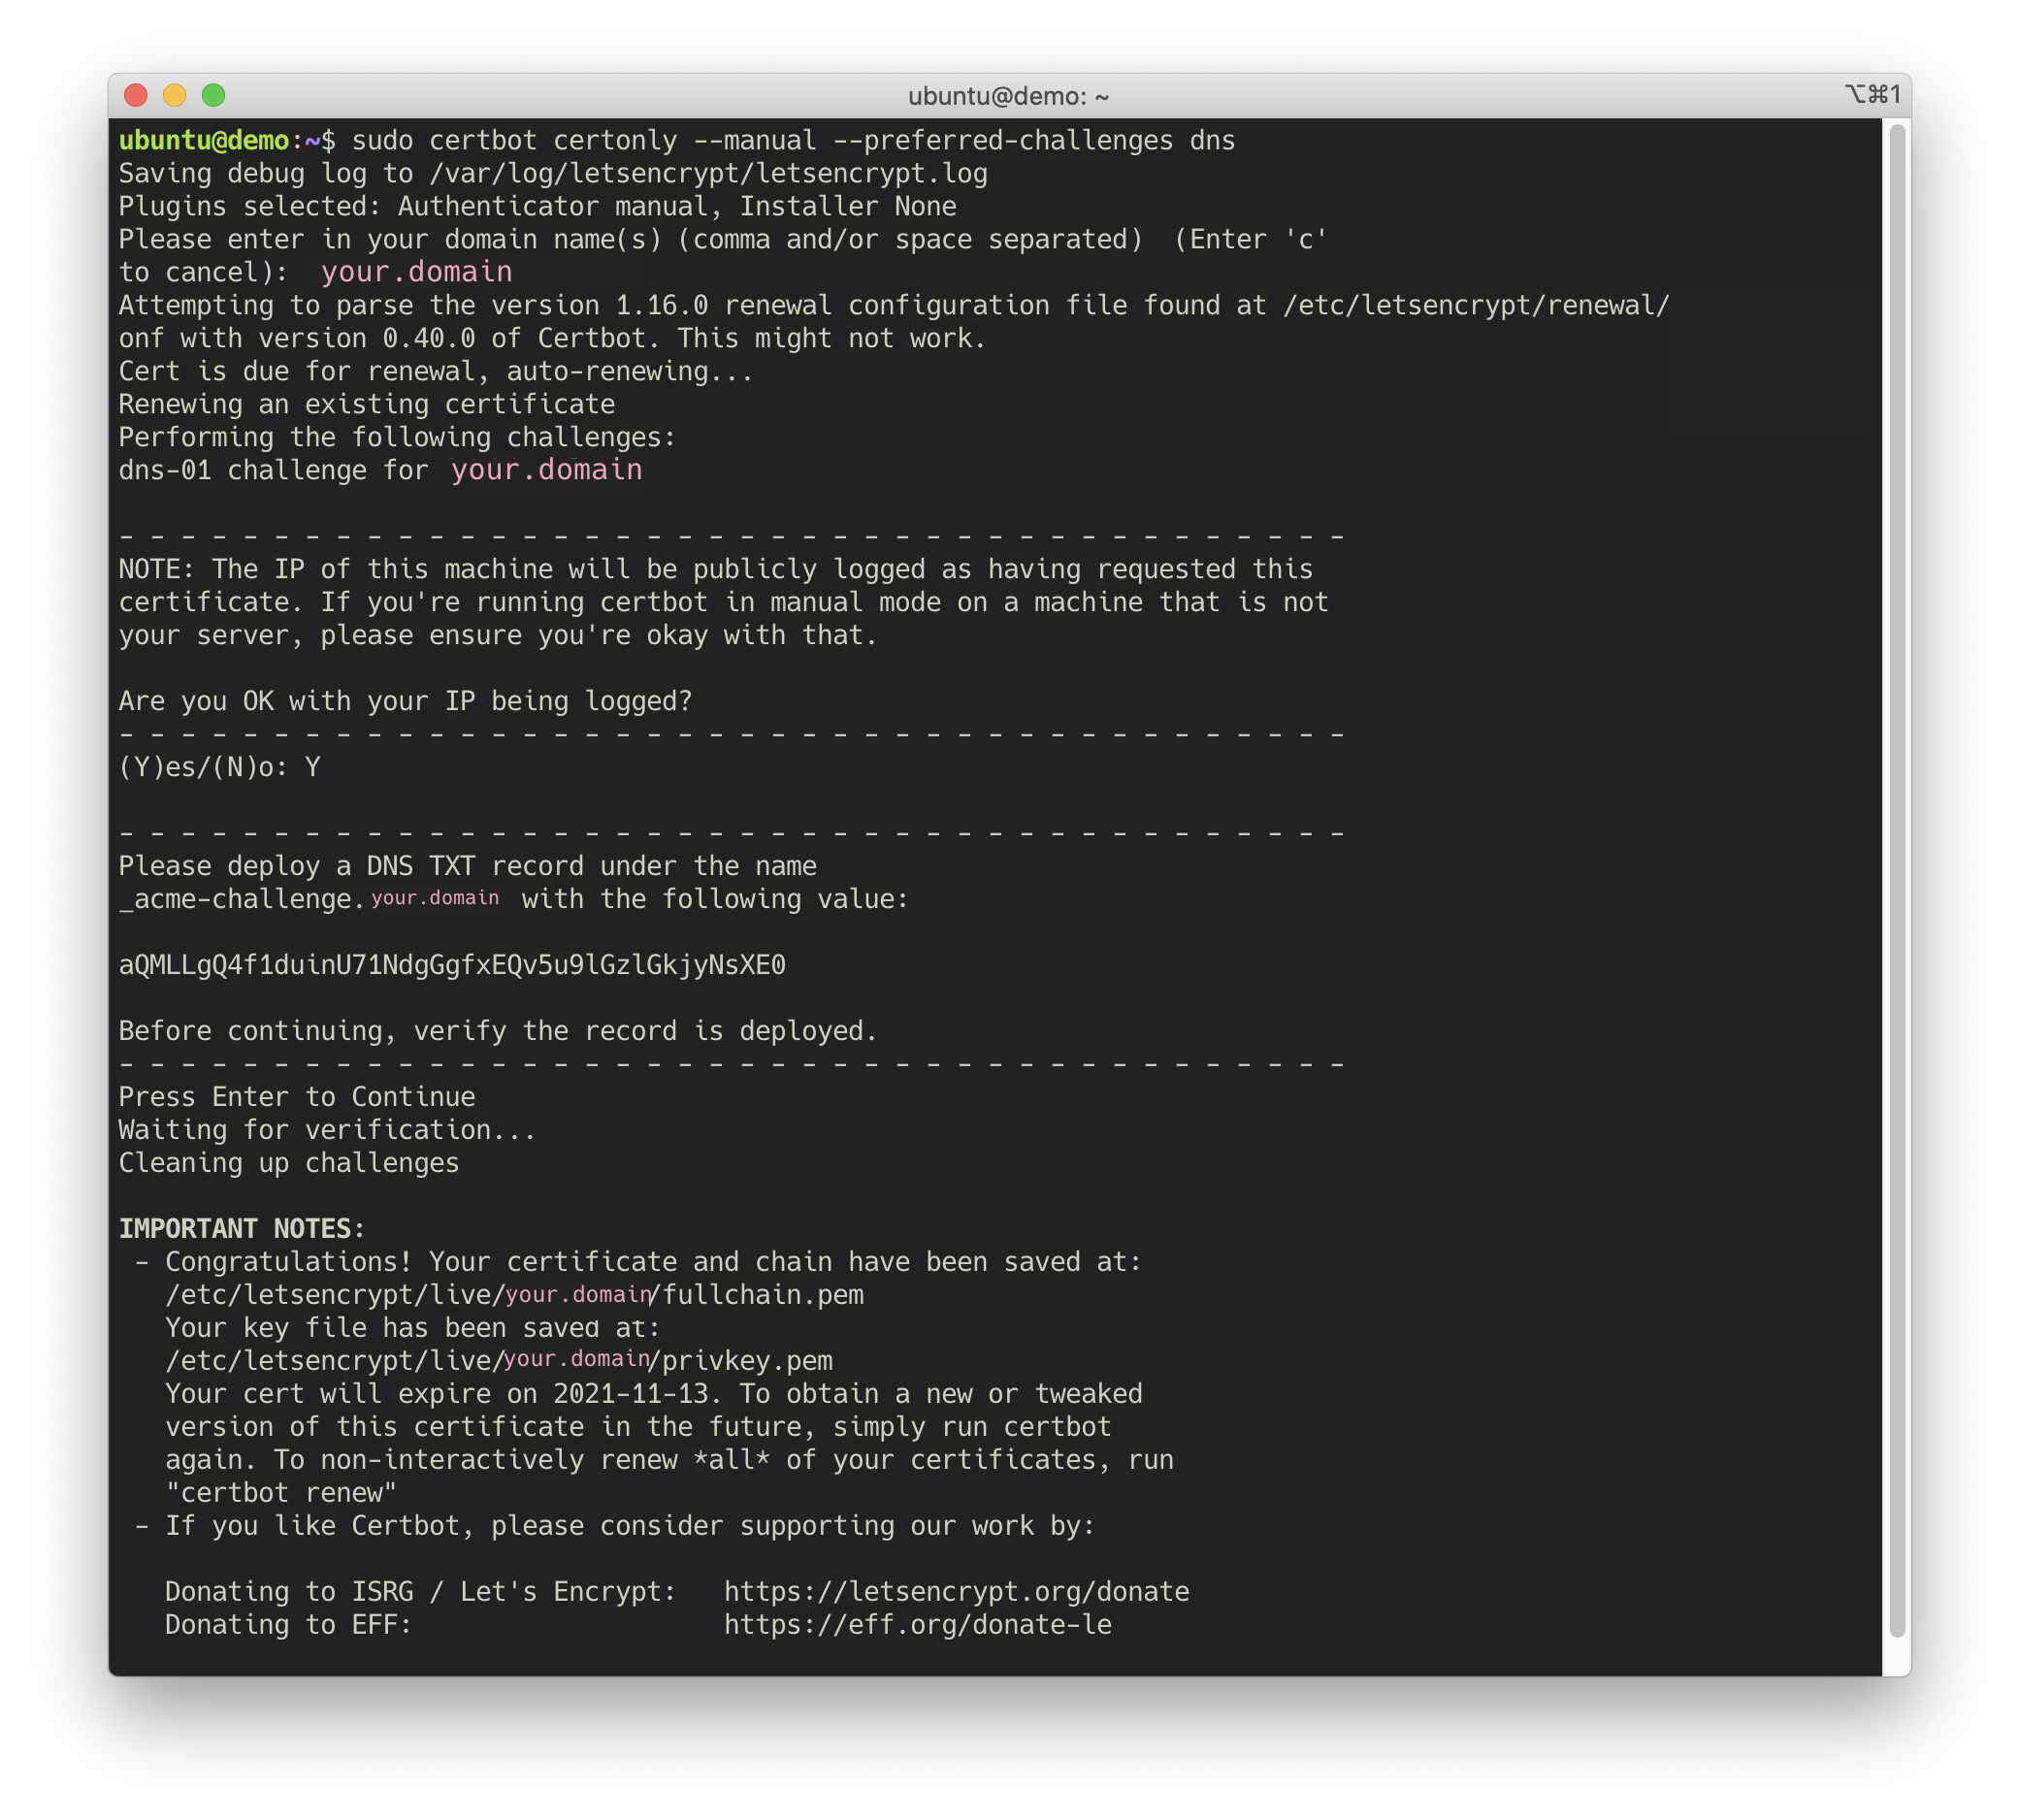
sudo certbot certonly --manual --preferred-challenges dns
It will ask you some questions (email etc).
Enter your domain name, e.g. john_smith.tk, and answer
Yes to the public logging question.
Next, it will ask you to add an ACME challenge token to your DNS:
_acme-challenge.your.domain 6wMpfi5ZXG0rbJt7_H2qFtT9_YUVJY_5VzEtbsJnD8.
Don't press Enter yet, go to DNS provider page and add a TXT entry:
| Name | Type | TTL | Target |
|---|---|---|---|
| _acme-challenge | TXT | 300 | 6wMpfi5Z...tbsJnD8 |
See screenshots above as your guidance.
Similarly, you can check the presence of the DNS entry in dnschecker.org (use
_acme-challenge.your.domain instead of just your.domain there).
Once, it appears there, press Enter in certbot.
It should congratulate you and say where the certificates are saved.
Here is how it all looks in my case:
By default, the keys are restricted to a root user only. You can loosen the permissions with
sudo chmod -R 755 /etc/letsencrypt
to allow programs (Jupyter, Flask) run by a user to have an access to keys, otherwise you will have to run
these libraries under root.
The certificate is valid for 3 months, then you need to renew it.
Letsencrypt (certbot) will send an
email to the address you specified when registering your first certificate.
The renewal procedure is the same: running the certbot command and
passing the
ACME challenge (see above).
At this point, I hope, you have an instance running with the environment as well as a registered domain name
that is
mapped to the IP of the instance by a DNS.
If so, the next step is pretty simple: instantiate a tmux session and
start the Flask app from
there as such
conda activate detector
export FLASK_APP=./WebsiteYOLO/main.py
export FLASK_RUN_CERT=/etc/letsencrypt/live/your.domain/fullchain.pem
export FLASK_RUN_KEY=/etc/letsencrypt/live/your.domain/privkey.pem
flask run --host=0.0.0.0
If flask run fails and tells you that you don't have fullchain.pem or
privkey.pem, most likely you need to change the ownership of these files
to your user.
However, I also found that different versions of the environment packages
may cause this error but I didn't have an opportunity to inspect which ones and why.
Alternatively, you can run flask under root.
If no errors occur, go to your.instance.ip.address:5000/status_check
– your browser should print GET request received and flask will print this event to the
terminal.
If you cannot see GET request received, you need to check if port 5000 is opened in the
network settings of your instance.
Repeat the same with your domain name instead of the IP:
https://your.domain:5000/status_check
Next, if we go back to front-end and try to upload the image and send a POST request.
On success, your instance terminal should output something like this for both
GET and POST
requests:
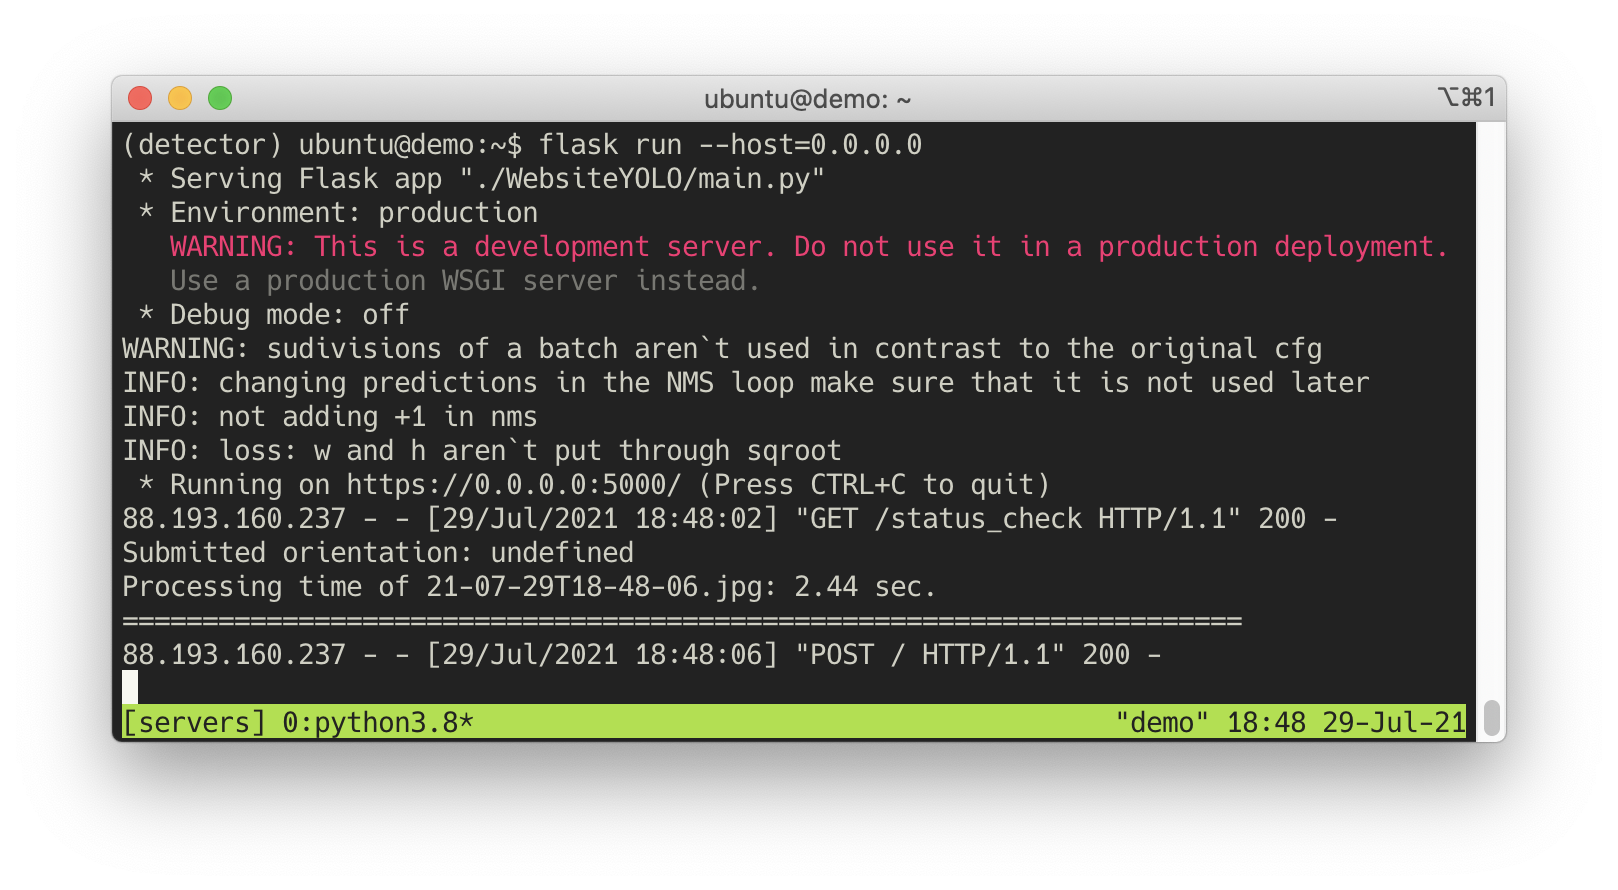
If you are seeing this, I think, you succeeded. Well done!
This guide is a bit sparse and might not contain every small detail. If something is not clear, feel free to let me know by email or form an issue in the v-iashin/v-iashin.github.io repository. Also, if you found this useful and managed to build your project on top of it, send me a link I would be happy to check out.