CLIP
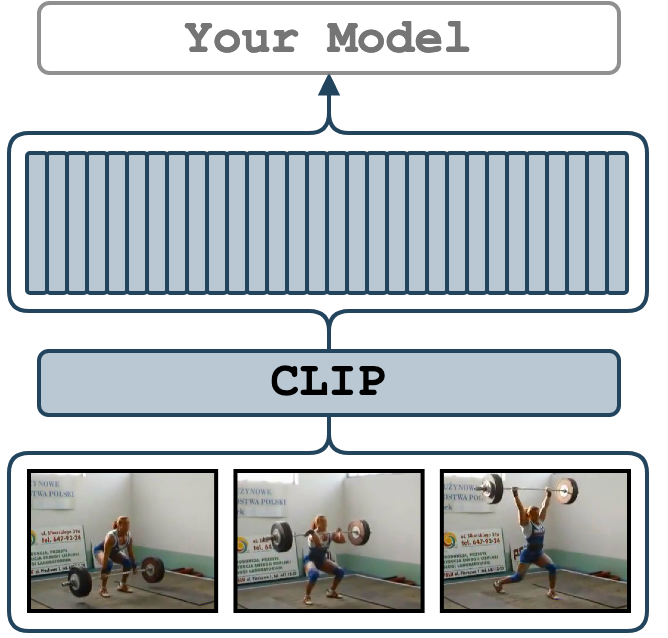
The CLIP features are extracted at each frame of the provided video.
CLIP (Contrastive Language-Image Pre-Training) is a neural network trained on a variety of (image, text) pairs.
We use CLIP's official augmentations and extract vision features from its image encoder.
The implementation uses the OpenAI CLIP.
The extracted features are going to be of size num_frames x 512.
We additionally output timesteps in ms for each feature and fps of the video.
Quick Start
![]()
Ensure that the environment is properly set up before proceeding. See Setup Environment for detailed instructions.
Activate the environment
and extract features at 1 fps from ./sample/v_GGSY1Qvo990.mp4 video and output results.
python main.py \
    feature_type="clip" \
    model_name="ViT-B/32" \
    extraction_fps=1 \
    video_paths="[./sample/v_GGSY1Qvo990.mp4]" \
    on_extraction="print"
Supported Arguments
Argument |
Default |
Description |
|---|---|---|
model_name |
"ViT-B/32" |
A variant of CLIP. "ViT-B/16", "RN50x16", "RN50x4", "RN101", "RN50", and "custom" are supported. |
batch_size |
1 |
You may speed up extraction of features by increasing the batch size as much as your GPU permits. |
extraction_fps |
null |
If specified (e.g. as 5), the video will be re-encoded to the extraction_fps fps. Leave unspecified or null to skip re-encoding. |
device |
"cuda:0" |
The device specification. It follows the PyTorch style. Use "cuda:3" for the 4th GPU on the machine or "cpu" for CPU-only. |
video_paths |
null |
A list of videos for feature extraction. E.g. "[./sample/v_ZNVhz7ctTq0.mp4, ./sample/v_GGSY1Qvo990.mp4]" or just one path "./sample/v_GGSY1Qvo990.mp4". |
file_with_video_paths |
null |
A path to a text file with video paths (one path per line). Hint: given a folder ./dataset with .mp4 files one could use: find ./dataset -name "*mp4" > ./video_paths.txt. |
on_extraction |
print |
If print, the features are printed to the terminal. If save_numpy, save_pickle, or save_h5, the features are saved to either .npy, .pkl, or .h5 file. |
output_path |
"./output" |
A path to a folder for storing the extracted features (if on_extraction is save_numpy, save_pickle, or save_h5; the latter saves to one file). |
keep_tmp_files |
false |
If true, the reencoded videos will be kept in tmp_path. |
tmp_path |
"./tmp" |
A path to a folder for storing temporal files (e.g. reencoded videos). |
show_pred |
false |
If true, the script will print the predictions of the model on a down-stream task. It is useful for debugging. |
pred_texts |
null |
If show_pred=true, the texts specified in pred_texts are used for zero-shot classification (e.g. pred_texts="['a dog smiles', 'a woman is lifting']"). If pred_texts is unspecified, Kinetics 400 classes will be used. |
Examples
Make sure the environment is set up correctly. For instructions, refer to Setup Environment.
Start by activating the environment
It is pretty much the same procedure as with other features.
Here we take ViT/B-32 as an example, but we also support ViT-B/16, RN50x16, RN50x4, RN101, RN50
and others in OpenAI CLIP implementation.
In addition, if you want to use your weights, you need to copy your weights to
models/clip/checkpoints, rename it CLIP-custom.pth and specify model_name=custom.
python main.py \
    feature_type="clip" \
    model_name="ViT-B/32" \
    device="cuda:0" \
    video_paths="[./sample/v_ZNVhz7ctTq0.mp4, ./sample/v_GGSY1Qvo990.mp4]"
--on_extraction save_numpy (or save_pickle) – by default, the features are saved in ./output/ or where --output_path specifies.
In the case of frame-wise features, besides features, it also saves timestamps in ms
and the original fps of the video into the same folder with features.
python main.py \
    feature_type="clip" \
    model_name="ViT-B/32" \
    device="cuda:0" \
    on_extraction=save_numpy \
    file_with_video_paths=./sample/sample_video_paths.txt
--batch_size argument, which defaults to 1.
python main.py \
    feature_type="clip" \
    model_name="ViT-B/32" \
    device="cuda:0" \
    batch_size=128 \
    video_paths="[./sample/v_ZNVhz7ctTq0.mp4, ./sample/v_GGSY1Qvo990.mp4]"
--extraction_fps argument
python main.py \
    feature_type="clip" \
    model_name="ViT-B/32" \
    device="cuda:0" \
    extraction_fps=5 \
    video_paths="[./sample/v_ZNVhz7ctTq0.mp4, ./sample/v_GGSY1Qvo990.mp4]"
If you would like to verify the extracted features, you can
set show_pred="true" and provide several sentences with pred_texts argument.
The value of pred_texts should be a list of strings.
The probability that each frame corresponds to all the sentences you provide will be output.
python main.py \
    feature_type="clip" \
    model_name="ViT-B/32" \
    device="cuda:0" \
    extraction_fps=1 \
    show_pred="true" \
    pred_texts="['a dog smiles', 'a woman is lifting']" \
    video_paths="[./sample/v_ZNVhz7ctTq0.mp4, ./sample/v_GGSY1Qvo990.mp4]"
  Logits | Prob. | Label
  23.061 | 0.962 | a dog smiles
  19.824 | 0.038 | a woman is lifting

  Logits | Prob. | Label
  22.770 | 0.963 | a dog smiles
  19.520 | 0.037 | a woman is lifting

  Logits | Prob. | Label
  24.619 | 0.929 | a dog smiles
  22.048 | 0.071 | a woman is lifting
...

  Logits | Prob. | Label
  30.966 | 1.000 | a woman is lifting
  15.272 | 0.000 | a dog smiles

  Logits | Prob. | Label
  32.671 | 1.000 | a woman is lifting
  15.413 | 0.000 | a dog smiles

  Logits | Prob. | Label
  32.555 | 1.000 | a woman is lifting
  16.151 | 0.000 | a dog smiles
...
You may also leave pred_texts unspecified or null (None) if you wish to apply CLIP for zero-shot prediction
on Kinetics 400.
Credits
- The OpenAI CLIP implementation.
- The CLIP paper
- Thanks to @Kamino666 who adapted this model for
video_features
License
The OpenAI CLIP implementation code is under MIT.